消息队列的好处
消息队列的主要特点是异步处理,主要目的是减少请求响应时间和解耦。所以主要的使用场景就是将比较耗时而且不需要即时(同步)返回结果的操作作为消息放入消息队列。同时由于使用了消息队列,只要保证消息格式不变,消息的发送方和接收方并不需要彼此联系,也不需要受对方的影响,即解耦和。
准备
yii2.0框架默认不带队列组件,但开发团队后面有出官方组件。
1.通过composer安装yii-queue组件
php composer.phar require --prefer-dist yiisoft/yii2-queue
2.选择队列驱动
目前此组件支持多种驱动,我这选择redis。yii2.0连接redis可以不安装php-redis插件,直接安装官方redis组件即可
php composer.phar require --prefer-dist yiisoft/yii2-redis
3.配置组件
配置redis:
'redis' => [//设置redis连接
 'class' => 'yii\redis\Connection',
 'hostname' => hostname,
 'port' => port,
 'database' => 0,//默认数据库
 ],
配置queue:
'queue' => [
 'class' => \yii\queue\redis\Queue::className(),
 'redis' => 'redis',
 'channel' => 'default', // Queue channel key
 ],
简单使用
1.推送任务到列表
Yii::$app->queue->push(new SomeJob([
    'property1' => $param1,
    'property2' => $param2
]));
SomeJob类实现yii\queue\RetryableJobInterface接口,实现其三个方法:
public function getTtr()
 {
     return $this->delay * 60;//重试间隔
 }
public function canRetry($attempt, $error)
{
//是否可以重试attempt是自定的最大重试次数
return ($attempt < $this->attempt) && ($error instanceof TemporaryUnprocessableJobException);
}public function execute($queue)
{
try {
//do something...
} catch (\Exception $ex) {
//此处抛出的异常须是canRetry中的异常类或其子类的示例,否则无法job无法重试
throw new TemporaryUnprocessableJobException($ex->getMessage(), $ex->getCode(), $ex->getPrevious());
}
}极简实例:
public function actionTest()
{
    Yii::$app->queue->push(new \common\queuejobs\TestJob());//添加job进队列
}
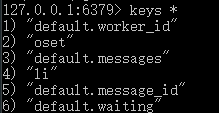
添加进队列后可以在redis中看到数据

//TestJob的execute(),写入文件到D://newfile.txt
public function execute($queue)
 {
     $myfile = fopen("D://newfile.txt", "w") or die("Unable to open file!");
     $txt = "Bill Gates\n";
     fwrite($myfile, $txt);
     $txt = "Steve Jobs\n";
     fwrite($myfile, $txt);
     fclose($myfile);
 }
//执行任务,为了方便,直接命令行执行
./yii queue/run
手动执行后,D盘多了newfile.txt

任务监控程序
在生产环境我们当然不可能手动执行./yii queue/run来开始worker,所以我们需要监控程序来替代我们。
1.crontab
使用Linux定时任务开始worker,配置示例如下
* * * * * /usr/bin/php /var/www/my_project/yii queue/run //命令是queue/run,此配置表示每分钟执行一次,具体语法请查crontab的使用
2.Supervisor
Supervisor是用Python开发的一个client/server服务,是Linux/Unix系统下的一个进程管理工具,不支持Windows系统。它可以很方便的监听、启动、停止、重启一个或多个进程。用Supervisor管理的进程,当一个进程意外被杀死,supervisort监听到进程死后,会自动将它重新拉起,很方便的做到进程自动恢复的功能,不再需要自己写shell脚本来控制。
安装supervisor
pip install supervisor
配置supervisor
[program:yii-queue-worker]
process_name=%(program_name)s_%(process_num)02d//worker名
command=phpdir/php projectdir/yii queue/listen --verbose=1 --color=0 //注意命令是queue/listen,不是queue/run
autostart=true//自动启动
autorestart=true//自动重启
user=www//用户
numprocs=4//worker数
redirect_stderr=true
stdout_logfile=/data/wwwlogs/yii-queue-worker.log//日志
之后就可以正常使用,多多关注日志就行。